twzResizeImages
This script lets you resize and optimize images from your browser after they've been uploaded to your web site. In principle, this is a bad idea - but I've found it very useful!
I say it's a bad idea because it's always preferable to optimise images BEFORE uploading them to the web. If you're a developer, you'll know that many web site owners seem unable or unwilling to do this, despite the fact that it's very quick and easy with any image manipulation software such as Photoshop (even MS Paint!).
Many site owners will upload images taken directly from a digital camera, which can be 2MB or more in size and are too large to even fit into a full screen browser window. Usually the browser will resize the image so it displays nicely on the page, but it first has to download the excessively large image. This is a gross waste of time and resources, because:
- Each image takes much longer to upload in the first place
- Larger images eat into your disk space on the server, and site backups will also be larger
- Every time a visitor goes to your site, the pages take longer to display
- Every visit to your site consumes more of your monthly bandwidth quota
So the bottom line is you may find yourself in a situation where images need to be downloaded from the server, optimized, and then re-uploaded. This script offers an alternative by resizing them directly on the server. It doesn't create a copy of the original image - it overwrites and replaces it! This is necessary so that any HTML page, CMS or database that refers to the image file doesn't need to know what's happening, and will continue to work as usual. (This shouldn't be a problem, because whoever uploaded the image should have the original stored locally as a backup).
Note that some CMSs include an image resizing utility, and others will even automatically resize uploaded images (possibly storing multiple copies of the same image).
The twzResizeImages script guides you through a simple 4 step process, and can be easily learned and used by site owners.
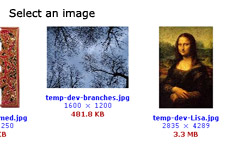
Step 1 - select an image
A list of thumbnail images will be shown (files smaller than a preset threshhold will not be included). With each thumbnail, the filename, image dimensions and file size are also shown. Choose an image to resize simply by clicking on it. |
|
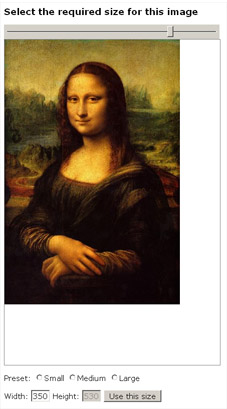
Step 2 - select the required size
Decide what size you want the image by moving the slider, or by selecting a preset size (presets can be customised for your site). You can also enter a specific value in the width input box. The aspect ratio is always maintained, so you can't stretch the image out of shape. The allowable minimum and maximum sizes are determined respectively by the "small" and "large" presets. Click on the "use this size" button to proceed to step 3. |
|
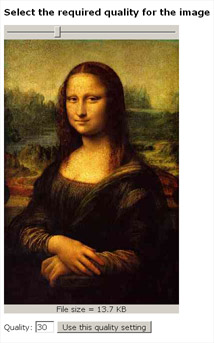
Step 3- select the required image quality
Use the slider to set the required image quality (applies to JPEG images only). As you move the slider, the image changes to show what the final result will be like, and also shows the expected filesize of the final image. Click on the "use this setting" button to proceed to step 4. |
 |
Step 4 - confirm and overwrite
Finally a preview image will be shown at the size and quality settings you selected. Check the box and click confirm to overwrite the original image file with the optimized verson. You will then be returned to the list of remaining images (step 1). |
 |
A configuration file lets you change many settings to suit the site, including
- Size of thumbnail images
- Size of presets "small", "medium" and "large"
- Minimum filesize of files to be included
The generated HTML is generously laced with CSS classes and ids, so the output can be styled in many different ways by simply tweaking the stylesheet.
twzResizeImages
Version:
1.0
Licence:
freeware
Requires:
PHP4+
Filename:
twzResizeImages-v1.0.zip
File date:
2010-04-16
Reply #2 on : Sat August 08, 2015, 22:06:23
Write a comment
- Required fields are marked with *.


Reply #1 on : Sat August 08, 2015, 19:28:28