twzContact makes it easy to create a custom contact page on your web site. For a lightning-fast start, try out the sample form.php that comes with twzContact (see the installation page).
Here are some step-by-step instructions to get you started in building your own form from scratch:
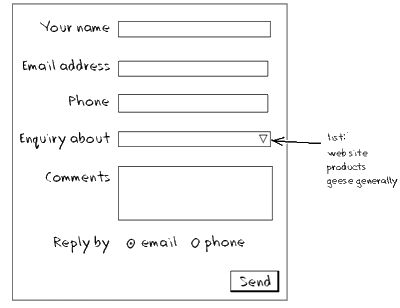
Start by thinking about what information you want from your visitors, and sketch how it will look on paper:

The most important thing is what fields you want on the form. In the above example, there are 6 fields, called:
Once you know basically how you want the form to look, you can start building it.
We can now start building the settings file, starting with the [Fields] section. The settings file is a plain text file, usually called twzContact.ini. Open Notepad (or any other text editor), and type – or copy and paste – the following:
[Fields]
your name     = text
email address = text
phone         = text
enquiry about = select
comments      = textarea
reply by      = radio
The [Fields] section is just a list of the fields you want, in the same order they should appear on the form.
Next to each field name is what type of field it is. You can add extra spaces before and after the equals sign
( = ) to make the list easier to read.
Next we will specify the style (CSS) class to be used for each field, and whether it is a required input.
We'll use a CSS class called widebox to make all fields the same width. We also want the name and
comments fields to be mandatory (required). We now have:
[Fields]
your name     = text, widebox, 1

email address = text, widebox
phone         = text, widebox
enquiry about = select, widebox
comments      = textarea, widebox, 1
reply by      = radio
We will define the widebox style later.
We also need to say what options should be in the drop-down list (enquiry about field) and radio buttons (reply by field). This is done with a [Field Options] section.
Beneath the [Fields] section, add the following:
[Field options]
enquiry about = web site, products, geese generally
reply by      = email, phone
You can add an empty item to the select list by adding just a comma before the first real option.
And you can pre-select an option by adding an asterisk or star ( * ) to the option, for example:
[Field options]
enquiry about = , web site, products, geese generally
reply by      = email*, phone
What message do you want the visitor to see after they submit the form? And if they miss out a mandatory field, we need some kind of error message. For these we can add a [Message Options] section to the settings file:
[Message Options]
MsgThanks     = Thanks - your message was successfully received.
MsgMissing    = Please check the form - the following fields had a problem:
You don't have to include this section; if you don't, default messages will be used.
We also need to tell twzContact where to email the message after the visitor has successfully submitted it.
Set the ToAddress to your own email address.
[Email Options]
ToAddress     = meself@littlepuddle.com.au
FromAddress   = visitor@mysite.com
Subject       = Message from your web site
Here is the complete settings file for our sample form:
[Fields]
your name     = text, widebox, 1
email address = text, widebox
phone         = text, widebox
enquiry about = select, widebox
comments      = textarea, widebox, 1
reply by      = radio

[Field options]
enquiry about = , web site, products, geese generally
reply by      = email*, phone

[Message Options]
MsgThanks     = Thanks - your message was successfully received.
MsgMissing    = Please check the form - the following fields had a problem:

[Email Options]
ToAddress     = meself@littlepuddle.com.au
FromAddress   = visitor@mysite.com
Subject       = Message from your web site
This gives twzContact all the information it needs to create the contact form, and send an email to you on successful submission.
Styles can be either included in the web page containing the contact form, or in a separate .css file.
In our example, we'll use a separate file called form.css. You can create this file with any
text editor such as Notepad.
.widebox { width:250px; }

label.required { font-weight:bold; }
.missing { background-color:#ffa; }

.postOK { color:#8d8; margin-bottom:10px; }
.postError { color:#b40; margin-bottom:10px; }
Earlier, we specified that text boxes on the form will use a CSS class called widebox.
In the CSS above, we've defined this to be 250 pixels wide.
We've also used several of the classes built into twzContact, specifically:
This is the final step that brings it all together. Create an HTML file in your favourite editor (a text editor such as Notepad can be used). In most cases, you must name the file with a .php extension, for example contact.php, and NOT contact.htm or contact.html.
<html>
<head>
  <title>Contact us</title>
  <link rel="stylesheet" href="form.css" type="text/css" />
</head>

<body>
  <h2>Contact Us</h2>
  Please complete the following form to contact us
  <?php define('INI_FILE', 'twzContact.ini'); require_once('twzContact.php'); ?>
</body>

</html>
The most important part is shown in bold above. The define part tells twzContact where to find the settings file, and the require_once part inserts the contact form. This web page can be as complex as you like, and contain more than just the contact form, but we have simplified it for this example.
To test your form, upload the files to your server, and browse to the contact.php page. The minimum files you should upload for this example are:
For testing your CSS styles locally without PHP, see the tips at Include text